23x tips how to paint a room like a pro

Mastering the Art of Professional Painting

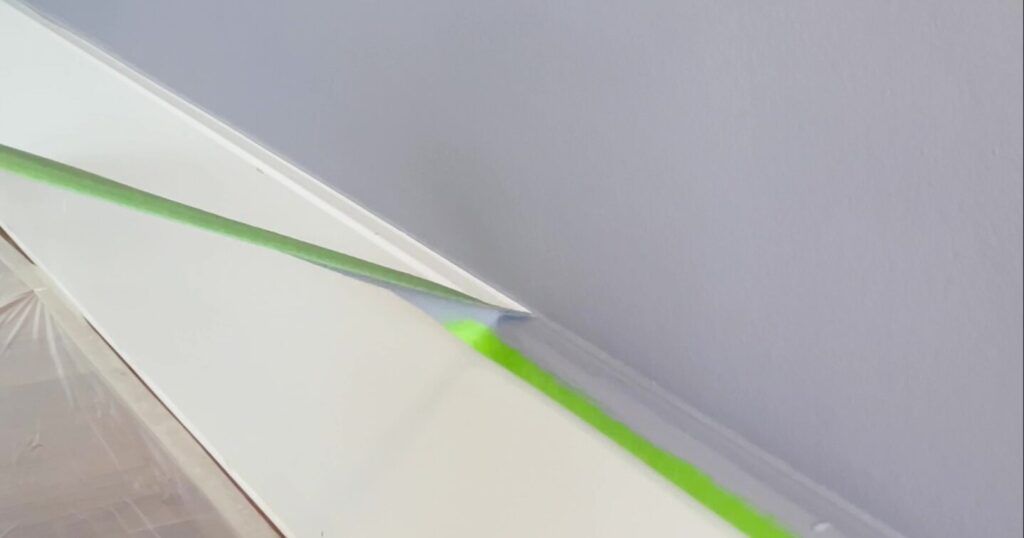
Welcome to this article where we unveil 23 expert tips for painting a room with professional finesse! This blog post is packed with insider knowledge that can transform your approach of your next paint job. We’ve gathered insights from experienced painters and interior designers to provide you with practical, step-by-step advice on achieving flawless results. From choosing the right tools to mastering the art of even strokes and perfect finishes, each tip is designed to guide you through the process and help you paint your space like a pro. When painting, you can use the best paint and brushes money can buy, but if you don’t properly mask the surfaces that you don’t want painted you won’t get the professional-looking results you desire. Use painter’s tape along wall and ceiling edges, on fixtures, and around trim and molding to keep clean, sharp paint lines and to protect surfaces from unwanted drips and splatters. So, grab your brushes and rollers, and let’s dive into the world of professional room painting!

Tip 1 - Empty the room for efficiency

When preparing a room for painting, it’s crucial to start by clearing out the space. Even small paint splatters can significantly cover a floor, so removing furniture and other items is essential to avoid any mishaps. For larger pieces that can’t be moved, covering them in the center of the room may suffice, but thoroughness is key, especially during tasks like drywall repair where dust and debris spread easily. Always remove doors, light fixtures, and hardware, labeling them for easy reassembly. Invest in high-quality drop cloths like canvas or paper-backed plastic, as they provide the best protection. Lightweight fabrics and bedsheets are not recommended, as they allow paint to seep through. While plastic sheeting is an option, it can be slippery and doesn’t absorb drips, posing a safety risk and cleanup challenge.

Tip 2 - Use two buckets when degreasing Your Walls Before Sanding

When preparing your walls for sanding, it’s wise to use a two-bucket system for degreasing. This method is all about maintaining cleanliness and efficiency. In one bucket, mix your cleaning solution, and use it to scrub the walls. The second bucket is filled with clean water for rinsing your sponge or towel. This approach ensures that you’re not reapplying grime and dirt back onto the walls. It’s a simple yet effective way to guarantee that your walls are properly prepped, clean, and ready for a smooth sanding process. This dual-bucket strategy is a small step that makes a significant difference in the quality of your preparation.

Tip 3 - Check for cracks & dents and repair them

Using a bright light, such as a lamp, to highlight minor imperfections on a wall can be highly effective. This technique makes even small cracks, bumps, or imperfections like nail pops more visible, facilitating their repair. For minor flaws, using painter’s putty or lightweight spackle is advisable. In contrast, for deeper dents, materials like plaster of Paris are more suitable due to their durability and depth coverage. Different approaches are necessary for varying surfaces; for instance, spackle may not adhere well to wood. In such cases, using a specialized wood filler ensures better adherence and results. After any repairs, smoothing over with a drywall pole sander is recommended for achieving a more even surface, essential for both the aesthetics and effectiveness of the final paint job.

Tip 4 - Take the time when sanding the room

Taking your time while sanding a room before painting is essential for a superior finish. This step is not just about smoothing the surface; it’s about creating the ideal base for paint to adhere. Careful and thorough sanding eliminates imperfections, evens out surfaces, and ensures that the coats of paint look smooth and professional. Rushing through this process can lead to a less than satisfactory paint job. Patience and attention to detail during sanding are investments that pay off in the overall quality and durability of your paintwork.

Tip 5 - Remove dust with a vacuum cleaner and the brush attachment

After sanding your room, it’s crucial to remove all the dust to ensure a clean surface for painting. The most effective way to do this is by using a vacuum cleaner with a brush attachment. This method efficiently collects the fine dust particles that sanding leaves behind, which could otherwise hinder the paint’s adhesion to the wall. It’s a simple yet critical step to ensure that your walls are immaculately clean and ready for a flawless coat of paint.

Tip 6 - Prep the room

When prepping a room for painting, it’s vital to cover the floor thoroughly. Even the most skilled professionals occasionally drip or spill paint, so adequate floor protection is a necessity. Using quality drop cloths or plastic sheeting ensures that any accidental spills or splatters are caught, significantly reducing clean-up time and effort. This step is about more than just protection; it’s about efficiency.

Tip 7 - Use painter's tape or masking tape - even the pros do!

Here’s a little industry secret (and no, it’s not about our amazing masking tape applicator we sell – but hey, check that out too!) – even the pros rely on painter’s or masking tape for those sharp, clean edges. It’s especially crucial when dealing with multiple coats or when tackling tricky areas like windows. 

Always opt for quality tape or use no tape at all. Cheap options might save you a few bucks, but they often lead to bleeding, which means more touch-up work later. To ensure those crisp, clean lines, press the tape down evenly and firmly. A pro tip? Remove the tape while the final coat is still a bit tacky. Waiting until it’s completely dry can lead to the dreaded paint peel-off. So, invest in good tape, apply it with care, and peel it off at the right time for perfect edges.

Tip 8 - Use acrylic-latex caulk to fill gaps before painting

Using paintable acrylic-latex caulk for filling gaps not only reduces drafts but also enhances the appearance of your trim. The key to effective caulking lies in the size of the cut at the tip of the tube – smaller than you might initially think, as too much caulk can create a mess. When breaking the inner seal, opt for a small wire over a nail to avoid enlarging the nozzle. Additionally, consider investing in a dripless caulk gun. This tool is designed to relieve pressure after each trigger pull, minimizing unwanted oozing and making the application process cleaner and more controlled.

In addition to the careful application of paintable acrylic-latex caulk for filling gaps, using masking tape can significantly enhance the precision of your work. By applying masking tape along the edges where you’ll be caulking, you can achieve perfectly straight caulk lines. This extra step ensures a clean, professional finish, making your trim look impeccably neat. Remember, after caulking, remove the tape while the caulk is still wet to avoid any mess or disruption of the caulk line.

Tip 9 - Choose the right primer for the job

When it comes to painting a room like a pro, selecting the appropriate primer is crucial for achieving a flawless finish. Investing in high-quality alcohol or alkyd primers can make a significant difference. These primers provide a solid base, effectively seal stains, and ensure that your topcoats bond securely to the surface. By using the right primer, you’ll create a smooth, durable foundation that enhances the overall look and longevity of your paint job.

Tip 10 - Don't be scared to use paint additives

Modern paints often dry quickly and can be challenging to work with. Using paint additives like Floetrol for latex paints or Penetrol for alkyds can be a game-changer. A few ounces per gallon slows down the drying process, making the paint easier to handle. This approach helps in tackling issues like bridging, where latex paints tend to form a skin, potentially tearing when removing tape. For areas prone to moisture, like bathrooms and kitchens, it’s recommended to use paints with built-in mildew fighters rather than relying solely on mildewcide additives. Prep these surfaces with a bleach solution and a stain-blocking primer to ensure lasting results.

Tip 11 - Choose the right roller for the job

Choosing the right paint roller is key to achieving the best results in your painting project. The ideal roller would ideally hold a lot of paint, create the desired texture, not spray or shed fibers, and be easy to clean. While the perfect roller doesn’t exist, you can get close by considering the nap length. A roller with a 1/2-inch nap, such as lamb’s wool, is a good balance, holding enough paint and providing moderate texture. Most professionals prefer 9-inch rollers for their lighter weight and ease of use, although some endorse wider rollers for their efficiency in covering large areas quickly.

What roller cover nap?

3-5mm Nap: Ideal for a smooth finish with water-based or oil-based gloss or semi-gloss paints. Best for doors or cupboards.
7-9mm Nap: Suitable for very smooth finishes on feature walls or where minimal texture is desired.
10-15mm Nap: The most common choice for walls and ceilings, suitable for flat or low sheen paints.
18-26mm Nap: Great for rough and textured surfaces like brick or render, designed to hold and apply more paint.

Width Considerations:

75-100mm: Good for interior projects like cupboards, door trims, and furniture, as well as exterior projects like fence posts.
130-180mm: Useful for doors, small walls, and benches in interior projects, and eaves or pergolas in exterior projects.
230-270mm: Best for large surfaces like walls, ceilings, fences, and floors.

Different roller materials suit different paints and surfaces:

Woven Polyester: Versatile for all paint types.
Knitted Polyester: Ideal for water-based paints on smooth surfaces.
Mohair Blend: Perfect for a high-quality finish with gloss enamels.
Sheepskin: Suitable for rough surfaces.
Foam: For smaller areas requiring a mirror finish with gloss enamels.
Micro Fibre: Compatible with most water-based paints.
Textured Rollers: Available in coarse, medium, and fine textures for different textured finishes.

Each type has specific uses and benefits, ensuring you get the best results for your painting project.

Tip 12 - Always de-lint your roller the first time

It’s essential to de-lint your roller! Brand new rollers often have loose fibers that can detach and stick to the painted surface, creating an uneven texture. By taking the time to remove these fibers before you start painting, you ensure a cleaner, more polished result. This can be done using a lint roller, tape, or even a vacuum cleaner with a brush attachment. This simple preparation step makes a significant difference in the quality of your paint job.

Tip 13 - Use a separate paint bucket

Professional painters often prefer using 5-gallon buckets with a roller grid over traditional paint pans for several reasons. These buckets can hold a larger quantity of paint, reducing the need for frequent refills. Moreover, their design is more stable, significantly lowering the risk of tipping over. Using a bucket also allows for the mixing of paint from different cans, ensuring uniform color throughout the project. When using a bucket and grid, dip the roller partially into the paint and roll it along the grid. This technique helps distribute the paint evenly through the roller’s nap.

Tip 14 - Get a proper painter's rod to speeds things up

Using a painter’s rod or pole can greatly facilitate painting ceilings, walls, and even floors. It eliminates the need for constant ladder use and reduces the risk of paint splatter on oneself, as you don’t have to stand directly beneath the area being painted. While there’s some debate among professionals regarding the ideal length for everyday use, a telescoping rod is widely recognized as the most versatile and practical choice, adapting easily to various heights and spaces.

Tip 15 - Invest in quality brushes

The selection of a high-quality paintbrush is crucial for achieving a professional-grade finish. As experienced painters emphasize, the skill of professionals is closely tied to their equipment. While a quality brush may cost between $15 and $25, its impact on the final result is significant.

When it comes to choosing a brush, consider the type of bristles. Natural bristle brushes are favored for oil-based paints by most professionals. However, for versatility in all painting tasks, synthetics are often recommended. Synthetic brushes are typically made from nylon, polyester, or a combination of both. Poly bristles are stiffer and excel in exterior or textured work, while softer nylon brushes are preferred for fine interior painting.

Pay attention to the bristle features as well. Look for tapered bristles, which aid in precise edging, and flagged tips, promoting even paint distribution. Brushes are available in various widths, ranging from 1 to 4 inches. The choice depends on the specific task; as professionals suggest, smaller brushes provide better control, but for larger surfaces like doors, starting with a 2- or 2-1/2-inch sash brush is advisable. The angled design of such brushes facilitates clean cutting and maximizes bristle coverage, ensuring a smoother application compared to square-tipped brushes.

Tip 16 - Don't overload the paint brush

Now, it’s essential to understand how much paint to load onto the brush. To guide you, follow the recommendation to dip the brush into the paint can just deep enough to leave about two fingers’ width of paint on the brush’s end. Too much paint can lead to an overloaded ferrule, affecting the brush’s performance, while too little paint can result in a time-consuming painting process.

Once your brush is loaded, it’s a good practice to remove excess paint by gently wiping it off inside the paint bucket.

Tip 17 - Correct mistakes while paint is wet

In case an unintended brushstroke lands on the wall, there’s no need to panic. Wet paint is relatively easy to clean. Keep a damp cloth within reach, and you can simply stretch the fabric over your finger and gently wipe the wet paint off the wall. It’s essential to take care not to let the excess cloth touch the wet baseboard by carefully wadding it up in your palm. This quick action can help maintain a clean and flawless finish.

Tip 18 - Paint in the right order

Painting in the correct order is a crucial step towards achieving a professional finish. While it may seem like a minor detail, the sequence in which you tackle different parts of a room can make a significant difference in the final result.

To paint efficiently and effectively, start by painting the ceiling first. This ensures that any paint splatters or drips from the ceiling won’t affect your freshly painted walls.

Next, move on to the walls. Begin with the trim, such as baseboards and window frames, before painting the main wall surfaces. This sequence allows you to create clean, sharp edges along the trim without worrying about smudging the walls.

Finally, complete the painting process by addressing any doors or cabinets in the room. Following this order ensures that you can work seamlessly and achieve a flawless finish without the need for extensive touch-ups.

Tip 19 - Always (lightly) sand between each coat of paint

A key step often overlooked in painting is lightly sanding the surface between each coat of paint. This practice, while seemingly minor, plays a crucial role in achieving a professional and smooth finish. Lightly sanding helps in removing any imperfections or brush strokes from the previous layer, ensuring a more even and consistent application of the next coat. It also aids in providing a slightly rough surface, which enhances the adhesion of the subsequent layer of paint. This process, although it might add a bit of time to your painting project, is instrumental in achieving that sleek, flawless finish that makes all the difference in professional painting jobs. 

Tip 20 - Start with the difficult objects first while you're fresh

Plan your paint job approach strategically. Starting with the more challenging objects and areas while you’re feeling fresh and energized can greatly enhance your painting experience. Begin by tackling the tricky elements in the room, such as intricate trim, detailed molding, or any objects that require special attention. This approach ensures that you have the mental and physical energy to focus on these areas, resulting in a more precise and professional finish.

Once you’ve completed the more demanding aspects of the project, move on to the larger, more straightforward surfaces like walls and ceilings. This sequence not only allows you to optimize your energy levels but also ensures that you give the most critical details the attention they deserve.

Tip 21 - Paint the doors horizontally

Most painters find it perfectly manageable to paint doors while they’re in place, but it’s often recommended to lay the door horizontally on sawhorses for a more controlled and even application. If you’re dealing with a paneled door, it’s advisable to begin by painting the panels and gradually work from the outside edges towards the center. A crucial tip from experienced painters is to watch out for corners, as paint tends to accumulate in these areas. To address this, lightly “tip off” the panel with a nearly dry brush while the paint is still wet.

When painting the stiles (vertical parts) and rails (horizontal parts) of the door, it’s essential to follow the natural grain of the wood. If the grain abruptly changes direction, such as at the junction of a rail and a stile, it’s recommended not to stop your brush stroke, as this can result in an uneven buildup of paint. Instead, apply paint in a full stroke across the joint and then “tip off” the overlapping section by brushing in the direction of the grain. One vital consideration is to ensure that the door is completely dry before painting the opposite side or rehanging it, as advised by seasoned painters.

Tip 22 - Store your brush in the fridge

Many professionals choose not to clean their brushes and rollers if they intend to use them again the following day for the same project. Latex paint has a slow drying time in colder temperatures, making it feasible to leave the tools for a brief period. For jobs spanning two days, a common practice is to wrap the rollers and brushes in plastic grocery bags and store them in the refrigerator. The key is to allow the roller to return to room temperature before reusing it, ensuring optimal performance.

It’s worth noting that roller covers can be quite challenging to clean thoroughly, which is why most professionals opt to purchase new covers for each job. This approach guarantees a fresh and clean start for each painting project.

Tip 23 - Be kind to yourself, we all need touch-ups!

Let’s face it, accidents are just a part of the painting process. But here’s the good news – there’s a simple trick to fix those little mishaps and make your paint job look flawless.

Keep a trusty, inexpensive sponge brush on hand for those moments when you need to blend a patch seamlessly with the rest of your wall or woodwork. It’s like having your painting magic wand! To achieve that roller-like finish, just give the paint a gentle dab. Remember, even the pros occasionally need a touch-up here and there, so don’t be too hard on yourself. Painting should be fun, and a touch-up sponge brush can be your secret weapon to perfection!

Keywords

painting tips, professional painting, paintbrush, paint roller, painting sequence, touch-ups, sponge brush, paint touch-up, blending, paint application, painting order, energy management, painting doors, painting objects, paint cleaning, roller covers, storing paint tools, masking tape, painters tape, professional paint job

nl_NL_formal

Your Cart

Uw winkelmand is momenteel leeg.

Terug naar winkel

This website uses cookies to optimize your experience.

We just use geolocation and traffic data, so that we can adjust our website to your needs. All data is anonymously stored and analyzed. Read more about is in our Privacy Beleid

This website uses cookies to optimize your experience.

We just use geolocation and traffic data, so that we can adjust our website to your needs. All data is anonymously stored and analyzed. Read more about is in our Privacy Beleid